Item directory
ESSENTIAL PLUS ADD-ON |
Item information is used to register parcels and shipments in an efficient way. When you register a parcel or shipment, the item information is retrieved from the item directory.
You can import or manually add items with appropriate key information such as weight, volume, customs information, dangerous goods details.
You can only use item information with printing favorites. It is not available for standard printing.
You can include item information in an email pre-notification.
For using items through APIConnect, please refer to the REST API documentation. For OnlineConnect, please refer to the XML file specification.
Create the item directory
Go to > .
Click to import item information from a tab-delimited file. Please refer to the example files.
Click to manually add item information.
Use item information
To register a parcel based on items, you must use a new or existing printing favorite.
Go to > .
Click , or Search followed by
 to the left of an existing printing favorite.
For a new printing favorite, enter details as instructed for printing favorites.
Check the Use item level checkbox.
To make further settings on an item, go to the Shipment and parcels section. Click and proceed to the Items section.
You can set an item filter. Only those items that are included in the filter will be shown and can be selected when the shipment is registered.
You can define a default number of items, higher than one (1). When the shipment is created the value is set in the Item quantity field.
Register a shipment with items
When a shipment contains items, it is important to register information in the right order.
The parcel information is automatically calculated based on the item information from the directory. If the parcel information needs to be adjusted, the parcel information that differs from the item information must be entered when all items have been added.
Note
When the item directory is used, dangerous goods information must be entered for each item, not on parcel level.
Go to > .
Choose a printing favorite where Use item level is activated.
Select items and add them by clicking .
Caution
When you add the items, the information is not aggregated in the item row.
For example, if two items with a weight of 1 kg each are registered, "1 kg" is shown in the item list.
The weight for the parcel equals the total of all items, that is, "2 kg".
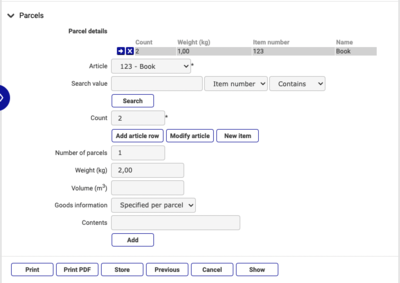
Register the parcel information that cannot be calculated or retrieved from the items included in the parcel, for example, weight exceeding the items’ total weight or contents.
Add the parcel to the shipment.
Register subsequent parcels.
When all parcels are registered, click to enter customs information for the shipment.
Note
When the item directory is used, some customs information must be entered for each item on row level.
Add a new item when a shipment is registered
Click in the Parcels section.
If the new item should be added to the item directory, click . If it should only be added to the specific shipment, click .
Edit item information when a shipment is registered
Click in the Parcels section.
If the item information should be updated in the item directory, click . If it should only be edited for the specific shipment, click .
Item information in email pre-notifications
You can include item information in email pre-notifications. The information you share with your receivers is item number, item name and number of items.
Go to > .
Click , or followed by
to the left of an existing item.Check the Include in pre-notification box in the Basic information section.