Create a delivery checkout
Caution
Before you begin, make sure you have at least one sender in your address book. Please refer to Add a new sender in the GUI, Address book via API or Import address book.
Note
All steps in the following procedure may not be relevant to you. Your set-up depends on your needs and your subscription plan.
Go to > .
Click .
The delivery checkout is assigned a unique Delivery checkout ID.
The name and description you give the delivery checkout, for example, "UK Checkout", is for internal use only.
Select a Default sender to automatically get for example, log in information and customer number.
Check the Advanced route handling box if you need to add another default sender for bulk services from abroad.
Check the Use the carriers' weight limits box if you want to use the carriers' limits for automatic weight validation.
Note
For carriers' weight limits you can use the
minimumparcelweightandmaximumparcelweightparameters at a later stage.Carriers' weight limitations will be overridden in case you set other weight conditions, for example, using the
weightparameter.Template should be set to "Qliro - Essential", "Qliro - Professional", "Qliro - Premium" or "Qliro-standard" , depending on your subscription plan .
Check the Advanced conditions box to activate extended use of conditions .
Click .
In the Languages section, select and add the languages that should be available in the delivery checkout, for example, "en".
In the Currencies section, select and add the currencies that should be available in the delivery checkout, for example, "EUR".
In the Category section you can create categories as a means to limit the number of delivery options shown in your webshop.
Tip
For best results, categories should be used together with sort order to show most attractive delivery options at the top of the list for certain target groups.
Agent radius can also be used to show most relevant (nearest) pickup locations.
Add new parameters, if applicable.
Click in the Delivery options section.
Delivery options
Note
For most delivery options, services, prices and addons it's possible to enter appliance conditions.
You can also use extended conditions to dynamically modify certain text fields.
Before creating your delivery checkout it's recommended to explore delivery conditions further.
The name you give the delivery option, for example, "Home", is for internal use only.
Check the Disabled box if you don't want the delivery option to be used immediately.
Tip
You can change the "Disabled" status at any time, for example, if there is a temporary problem with a carrier's service or if you only want to include this option at a certain time of year.
Assign the delivery option to a Category, if relevant.
Note
If you use both sub levels and categories you should assign the sub level to a category instead.
However, using categories can often replace using sub levels.
Select a service, in the Service section.
Click .
If the service has agents/pickup points you can decide which and how many agents to show using geolocation.
The distance to the nearest agents is calculated for every zip code. For example, "20" means that agents within a radius of 20 km from a defined GPS coordinate are shown.
Geolocation can only be used in Belgium (BE), Denmark (DK), Estonia (EE), Finland (FI), Germany (DE), Luxembourg (LU), the Netherlands (NL), Norway (NO), Sweden (SE) and Åland (AX).
Enter a value in the Maximum radius (km) field if you want to show agents based on geolocation, otherwise it should be set to "0".
With Maximum number of agents you can limit the number of agents that is shown based on geolocation. Max. 15 agents.
Click or in the Prices section to enter the service price.
If , enter the price as a numerical value, for example, "7.0" in Price, in each currency section.
If , enter the cart value from which the delivery should be free, for example, "39.0", in Limit for free delivery, in each currency section.
In the Addons section, click
 to the left of an addon you want to activate or edit.
Check Preselected, Mandatory or both if the addon should be preselected and/or mandatory in the webshop.
Click in the Prices section to enter prices for the addon.
In each currency section, enter the price as a numerical value, for example, "1.0" in Price.
Caution
If you click when leaving the Edit addon page the addon is activated even if you haven't entered any information.
Click .
Click in the Fields for titles section if you want add a title that should be used under certain conditions.
In the Language section, enter a title in the languages you defined earlier.
Click in the Sort order section to specify in what place the delivery option should appear.
Example:
Earliest delivery time: 17:00
Latest delivery time: 22:00
Value: 2
If today's date is June 5 the parcel will be delivered between 5 p.m. and 10 p.m. on June 7.
General Key/values
You can make customizations that will enrich customer experience. The General Key/values section can be used to modify the look and feel of the shipping section in Qliro Checkout.
Enter Key and Value in the General Key/values section.
Click .
Key | Type | Description |
|---|---|---|
SupportsAccessCode | boolean | If provided and true, a field will be presented so that the customer can enter an access code. The access code will be optional. Max. 50 characters. Suitable for home delivery methods. |
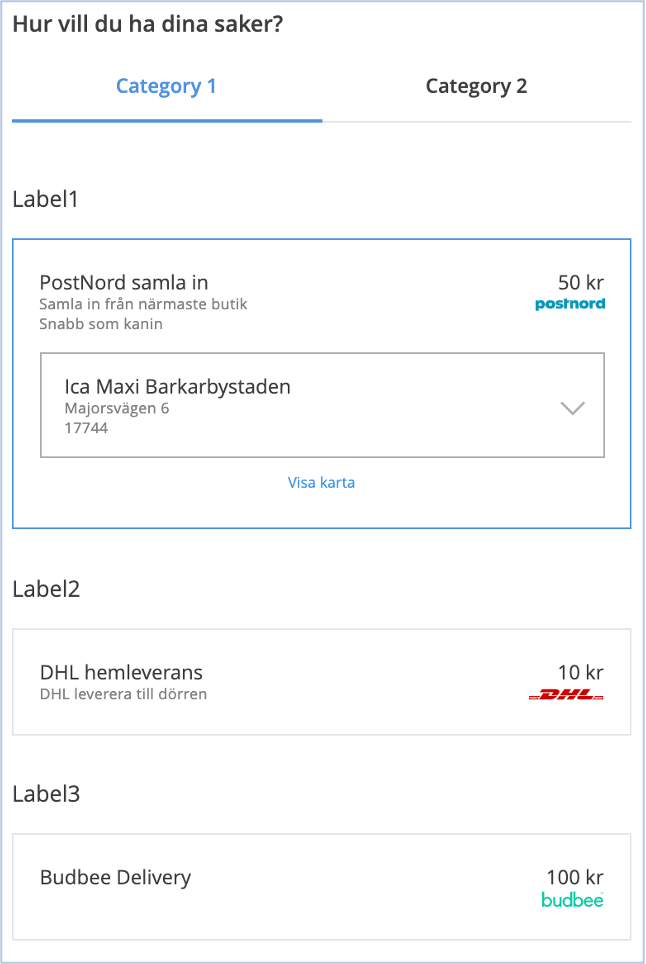
CategoryDisplayName | string | Can be used to group shipping methods. If used it must be set on all included shipping methods. Only 2 category values can be used for a list of shipping methods. Recommended values: "HOME_DELIVERY" and "PICKUP". Other values will be used as is. |
LabelDisplayName | string | To be used with categories. Only use 3 or less different labels for all shipping options. Recommended values: "Express", "Free" and "Economy". |
ShippingFeeMerchantReference | string | When the customer chooses a shipping method in Qliro One, an order item will be added to the cart, including the shipping fee for that particular shipping method. By default, the merchantReference of this fee item will be copied from the selected shipping option. If the ShippingFeeMerchantReference parameter is provided, the merchantReference will be overridden. Max. 200 characters. |
Example: Two categories and three different labels to categorize and label shipping options.
To add more delivery options for the delivery checkout, click on the New delivery checkout page and follow the steps above.
Tip
For some items, such as delivery options and prices you can change the order in which they appear in the webshop. Use the  or
or  icon next to an item row or use Sort order as described above.
Note
Custom agents are treated as a service and are added in the same way as other services.
Click to see how the delivery options will be displayed in the webshop depending on which parameters you enter.
Caution
"tocity" and "tozipcode" are always mandatory but for some carriers other parameters may be required as well.
To show, edit or delete a delivery checkout, use the search function.